Sunday, November 13, 2016

Braised Pork (thịt kho tàu) (as interpreted by a Chinese Cook) (REVISED)


My wife really loves it when her mother cooks thịt kho tàu, a Vietnamese braised pork dish, for her.  It always brings her back to her childhood.  I will likely never be able to replicate her mother's recipe, but this version of the dish gets her thumbs up.


Servings: 5-6

Ingredients:
* 2 lbs pork shoulder (trimmed) cut into 1-1/2 in. cubes
* 1/2 yellow onion cut into large pieces length-wise
* 4 cloves of garlic, smashed
* 5 hard boiled eggs, peeled (one can quail eggs drained)
* 1 tbsp dark soy sauce
* 4 tbsp fish sauce
* 12 oz coconut water
* 1/2 bar Chinese brown sugar (can substitute with 2.5 tbsp granulated sugar)
* Salt and Black pepper to taste
* 1 small Thai chili pepper cut into small rings (optional if you want to spice up the dish)

Step 1 - Blanch the Pork

  1. In a large stock pot,  add pork and enough water to fully submerge the pork.
  2. Heat pot until water is just boiling.
  3. Remove pot from heat.
  4. Carefully strain and rinse pork in cold water to remove scum.
  5. Rinse pot to remove any remaining scum.
Step 2 - Braise the Pork
  1. Add pork, coconut water, fish sauce, brown sugar, garlic, onion, and dark soy sauce to pot (optionally: Thai chili pepper)
  2. Add cold water to the pot until pork is just fully submerged.
  3. Bring to boil.
  4. Cover and reduce heat to low.  Simmer for 1-1/2 hours until pork is fork tender.
  5. About 30 minutes before the pork is done, add the hard boiled eggs to the pork and continue cooking.
  6. Season with black pepper to taste.

Serve hot over rice.

Sunday, October 9, 2016

Creamy Vanilla Cheesecake with Butter Cookie Crust


Here's What You Need:

Cheesecake

  • 16 oz cream cheese at room temperature
  • 16 oz sour cream
  • 3 large eggs
  • 1 cup sugar
  • 1 tsp of vanilla extract

Crust

  • 2 1/2 cups of finely ground butter cookies (I really like Danisa Butter Cookies.  I grew up with these and they are buttery delicious) (see picture #1)
  • 1/4 cup of melted butter

Sour Cream Topping

  • 16 oz sour cream
  • 1/3 cup of sugar
  • 1 tsp of vanilla extract


Here's What You Do:

Let's Start With the Foundation

  1. Pre-heat oven to 400 degrees F
  2. 1/4 cup melted unsalted butter
  3. Evenly spread the cookie crumbs out on a baking sheet and place in the oven (see picture #2)
  4. Toast crumbs for 5 minutes until golden brown (see picture #3)
  5. While the crumbs are toasting, line the bottom of a 9 in. springform pan with parchment paper (I am a big Alton Brown fan, so if you are interested, here is a great technique on how to line a round pan)
  6. Take the cookie crumbs out of the oven and pour it into a mixing bowl
  7. Reduce temperature of oven to 325 degrees F (or 350 degrees F with a conventional oven)
  8. Mix in the 1/4 cup of melted butter.  The crumbs should be moist and should stick together when squeezed between your fingers (see picture #4)
  9. Pour cookie crumb mixture into the springform pan and press down evenly onto the bottom of the pan (see picture #5)
  10. Refrigerate crust for 5-10 minutes (it is ok if the crust stays refrigerated a little longer as you make the cheesecake mixture).

For the Topping

  1. Mix sour cream, sugar, and vanilla extract together until smooth
  2. Refrigerate mixture

And Now For the Star

  1. Heat about 4.5 qt of water in tea kettle (or any other mechanism you choose).  We are going to use this for the water bath
  2. In a mixer, mix the cream cheese on low for about a minute until smooth
  3. A an egg into cream cheese and continue mixing.  Add next egg after previous egg is incorporated until you have added all three eggs
  4. Next slowly pour in the sugar and continue mixing until incorporated
  5. Add vanilla extract and sour cream and mix until fully incorporated (see picture #6)
  6. Take the pan and crust out of the refrigerator and wrap outside of pan in a layer of heavy duty foil (or a double layer of standard foil) (see picture #7)
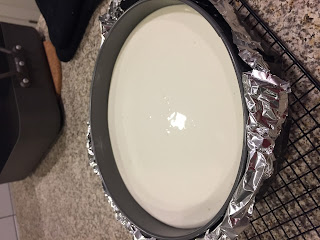
  7. Pour the cream cheese mixture into the pan (see picture #8)
  8. Use a spatula to smooth out the surface
  9. Place pan into a 16 inch roasting pan and pour hot water into roasting pan until water rises half way up spring form pan (about 2 inches) to make a water bath (see picture #9)
  10. Carefully transfer roasting pan into the oven and bake for 45 minutes until center still slightly jiggles and the edges are slightly firm (see video #1)
  11. Take the sour cream topping out of the refrigerator and carefully pour on top of the cheesecake.  Smooth out surface with a spatula. (see picture #10)
  12. Bake for another 5 minutes
  13. Carefully take the cheesecake out of the oven and place on a wire rack for at least 30-45 minutes until it is room temperature (see picture #11)
  14. Cover and refrigerate cheesecake at least 4 hours
Enjoy!


Picture #1

Picture #2

Picture #3

Picture #4

Picture #5

Picture #6

Picture #7

Picture #8

Picture #9


Video #1

Picture #10

Picture #11


Wednesday, October 5, 2016

Ooey Gooey Rice Krispie Treats

Aidan and Brooke made these (except for the stirring because "My arm is so tired, Mommy!" and they turned out great! Super ooey and gooey just like the packaged version which was what we were going for!

Ingredients
  • 4 tablespoons of butter
  • 8 cups of mini marshmallows
  • 1 teaspoon of vanilla
  • 1 tablespoon of milk
  • 6 cups of Rice Krispie Cereal

Instructions
  1. Slowly melt the butter in a large pan, low heat.
  2. Once butter is melted, add vanilla and 6 cups of marshmallows. Melt the marshmallows slowly.
  3. Right before the marshmallows are fully melted, add milk and the other 2 cups of marshmallows. Stir until the added marshmallows are starting to melt. (we don't want them fully melt so you will have fun pockets of marshmallow)
  4. Add the Rice Krispie Cereal. Stir until the cereal is fully coated with the marshmallow fluff.
  5. Dump into an 8 x 11 greased dish. Use a greased spatula to spread out the treats and press down just a bit (you don't want them so compacted that they become rock hard).
  6. Allow to fully cool before cutting and serving.

Thursday, September 22, 2016

Rice Cooker Mac and Cheese

If you are in a rush but want to do better than the boxed macaroni and cheese, here's a quick and simple recipe from my coworker. The chicken broth seems weird but it adds the salty and savory taste that makes it delicious w/out having to add any salt or butter to this. I like to use the steamer basket on my rice cooker and steam broccoli with the rice cooker as the macaroni and cheese is cooking...makes it a complete meal!

Ingredients

  • 1 can (14 ounce) chicken broth
  • 2 cups elbow macaroni (uncooked)
  • 3/4 cup milk
  • 2 cups shredded cheddar cheese ( I like a cheddar/jack blend)

Directions

  1. Place macaroni and broth in rice cooker. Secure lid and set to cook. 
  2. When rice cooker switches to warm (about 15 minutes) add milk and cheese. Stir.
  3. Keep on warm close lid and let sit for about 5 minutes or until cheese is well melted.
  4. Serve.
From Andrea

Sunday, May 22, 2016

My Go To Green Smoothie


Whenever I want a green smoothie that is refreshing, this is my go to.

I use a lot of Costco ingredients since that is my primary place for groceries.

Servings: 2

Ingredients:
  • 2 cups of Earthbound Farms Deep Green Blends Power (or any combination of Kale, Spinach, and baby greens.  Just watch out for putting in too much Kale as it may given the smoothie a slightly more bitter taste).
  • 1 cup of frozen pineapple, mango, or a combination
  • 1 tbsp of ginger (adjust to taste)
  • 1/2 Fuji Apple cut into into small pieces
  • 1/2 lime pealed
  • 1 cup of crushed ice
  • 1 tbsp of Agave syrup
Directions:
  • Combine all ingredients into a blender and blend until smooth.
Enjoy!